
How to Install Your Curbside Mailbox: A Simple Step‑by‑Step Guide
How to Install Your Curbside Mailbox
Tuesday April 14, 2026Installing a curbside mailbox doesn’t have to be complicated. Whether you’re upgrading your home’s curb appeal or replacing an old mailbox, we’ve made the process straightforward. Below is a helpful guide to what’s included with your mailbox, how to assemble it, and how to ensure proper placement for postal delivery.
Curbside Mailboxes: What’s Included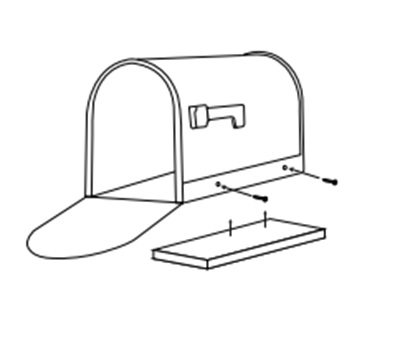
Applies to the following mailbox models:
SCF-1003, SCB-1005, SCC-1008, SCS-1014, SCB-1015, SCH-1016, SCS-1018, SCS-1019
When you purchase one of these curbside mailboxes, you will receive:
- One (1) fully assembled mailbox
- Four (4) 1 ¼” (#8) mounting screws
- One (1) optional wood mounting board
Assembly Instructions (With Wood Mounting Board)
- Attach the wood mounting board to any standard mailbox post.
- Use the supplied four 1 ¼” screws to secure the mailbox to the mounting board.
- Important: Make sure the mounting board does not interfere with the mailbox door opening and closing properly.
Curbside Mailboxes Without a Mounting Board
Not all mailbox models require a wood mounting board. 
Applies to models:
SCT-1010 and SCK-1017
You will receive:
- One (1) fully assembled mailbox
- Four (4) M6x20 bolts
- Four (4) M6 nuts and lock washers
Assembly Instructions
- Place the M6x20 bolts through the floor of the mailbox and the top of the mailbox mounting bracket.
- Secure the bolts using the supplied M6 nuts and lock washers.
- Tighten firmly to ensure the mailbox is stable.
Curbside Mailboxes with Paper Tubes
Some curbside mailbox models include a paper tube for added convenience. 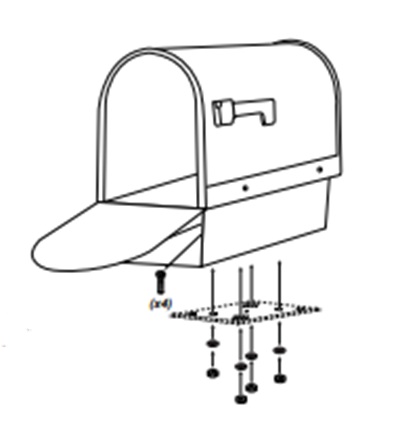
Applies to models:
SCF-1003, SCB-2005, SCC-2008, SCT-2010, SCS-2014, SCB-2015, SCH-2016, SCK-2017
You will receive:
- One (1) fully assembled mailbox with paper tube
- Four (4) M6x20 bolts
- Four (4) M6 nuts and lock washers
Assembly Instructions
- Insert the M6x20 bolts through the bottom of the paper tube and the mailbox mounting bracket.
- Secure with the supplied M6 nuts and lock washers.
- Check that the mailbox and tube are firmly attached before installation.

Proper Mailbox Placement Guidelines
For successful mail delivery, correct mailbox height and placement are essential.
- Height: Install the mailbox so the inside floor (or mail entry point for locked designs) is 41–45 inches from the road surface.
- Setback: Position the mailbox 6–8 inches back from the front face of the curb or road edge.
📬 Important Note: Before installing your mailbox, it’s always a good idea to contact your local post office. They can confirm the correct placement and height requirements for your specific location.
With proper assembly and placement, your curbside mailbox will be ready to serve you for years to come. If you have questions about your specific model, installation accessories, or compatibility with posts, we’re always happy to help—just reach out!
